YouTube, the biggest video-sharing platform globally, allows users to create customized banners for their channels. This space is crucial, as it’s a great way to catch viewers’ attention and make a solid first impression.
But it’s not just about having attractive images or catchy taglines. You must know the correct size and dimensions to make your banner look professional. Let’s learn about it!
Understanding YouTube Banner Size
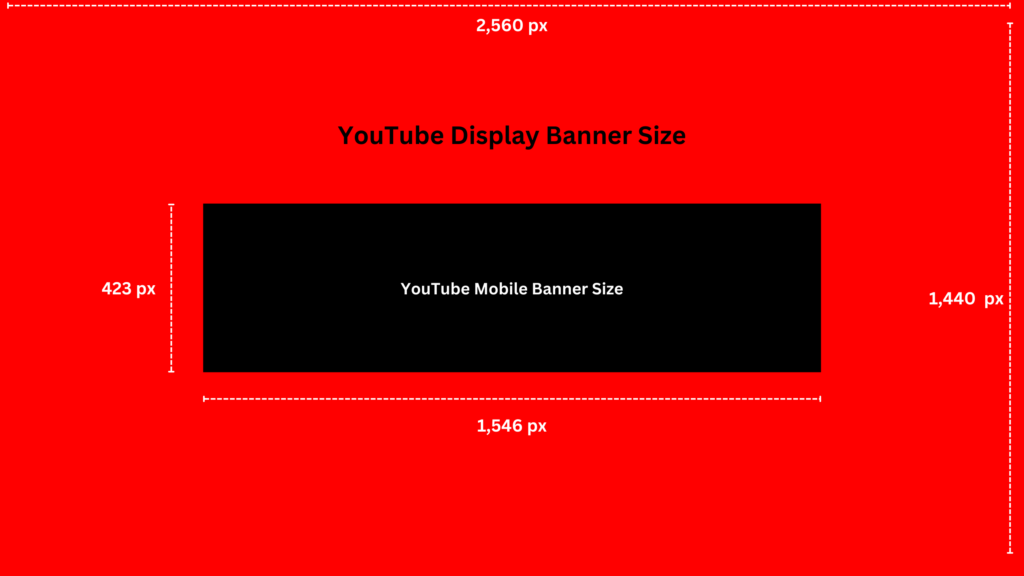
YouTube’s recommended banner size is 2560 x 1440 pixels.
It’s a large size because YouTube wants the same banner to fit on screens of various sizes, from TV to mobile phones. If your banner is similar to these dimensions, YouTube will stretch it to fit, causing your banner to look blurred or pixelated.
Moreover, the ‘safe area’ for all devices is 1546 x 423 pixels.
Critical content should be within this area to ensure it’s visible on all devices. A correctly sized YouTube banner helps your channel look great, whether a viewer is watching on a small phone or a giant television screen.
Making Use of the Safe Area
The ‘safe area’ is a space in the middle of the banner where your content is guaranteed to be visible on any device. This area measures 1546 x 423 pixels. You want to ensure your logo, channel name, or any other critical text or imagery is located here.
Remember, the banner’s top and bottom will be cut off on specific devices like mobile phones and tablets. So, please keep all the essential stuff in the safe area, and use the remaining space to enhance your design, keeping in mind that it might only sometimes be visible.
Selecting the Right Image
When choosing an image for your banner, make sure it’s clear, engaging, and related to the videos of your YouTube channel. The image should also have a resolution of at least 2560 x 1440 pixels to fit the banner space correctly.
While the banner image is crucial for branding, don’t forget the ‘safe area.’ Your primary focus should be designing a banner with the most important elements within this region. It will ensure they are visible on all devices.
How to upload a YouTube channel’s Banner?
Once you’ve designed your YouTube banner with the right size and dimensions, the next step is to upload it to your channel. This process might seem tricky, but don’t worry! We’ll walk you through it step-by-step.
Sign In to Your YouTube Account
First, you’ll need to sign into your YouTube account. If you don’t have one, you’ll need to create one. Once you’re signed in, you’ll be taken to the YouTube home screen. You can access your channel and start the banner uploading process from here.

Access Your Channel
After signing in, look towards the top right corner of the screen. You’ll see your profile icon. Click on it, and a drop-down menu will appear. From this menu, select “Your Channel.” You’ll now be taken to your channel’s main page, where you’ll see your current banner (if you have one) and other channel details.

Go to Channel Customization Settings
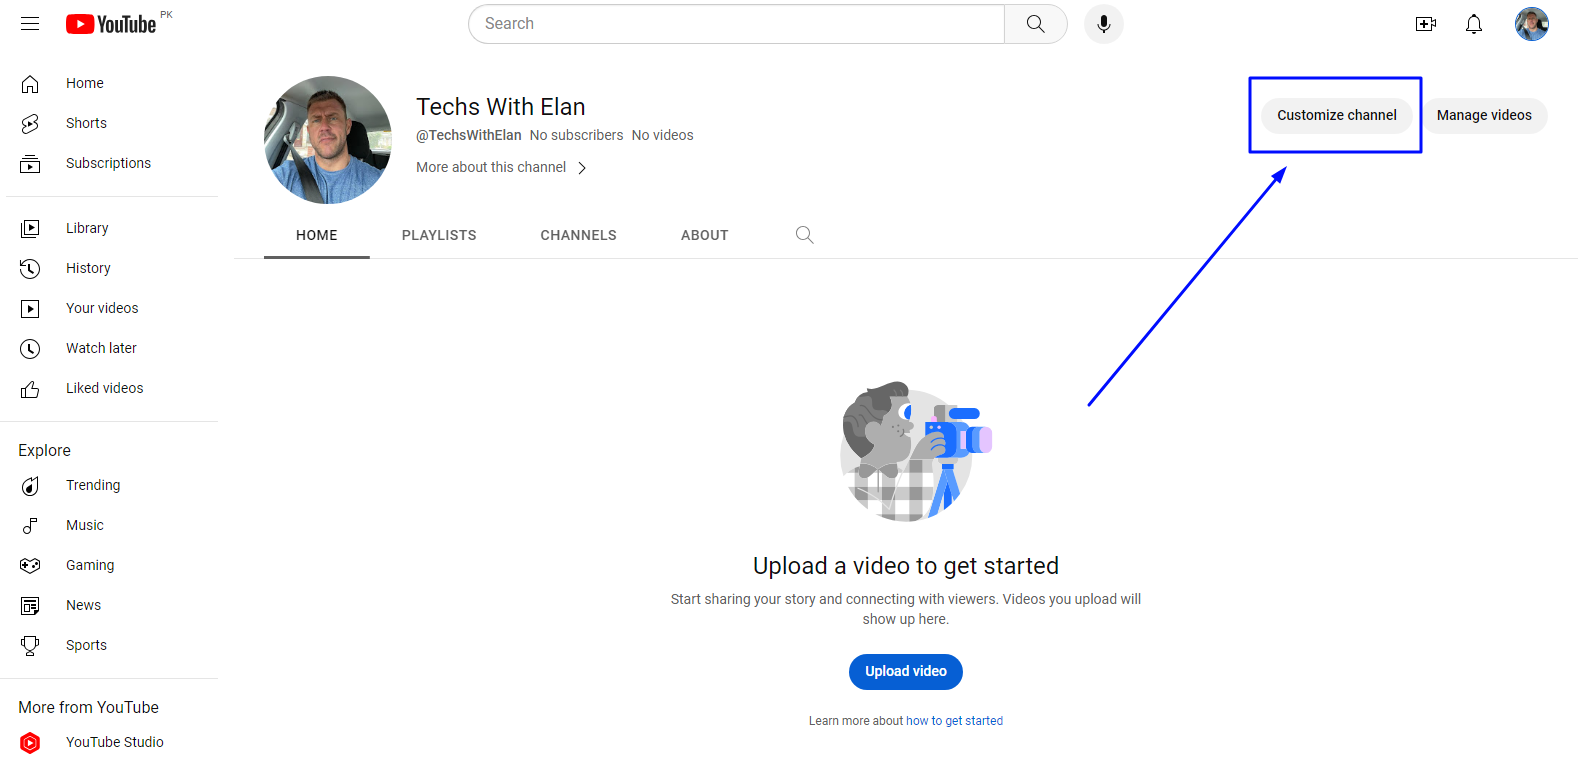
Once you’re on your channel page, look for a button named “Customize Channel” and click on it. It will take you to a new page where you can change your channel’s layout, branding, and basic information. For our purpose, we are interested in the “Branding” tab.
Selecting the Banner Image
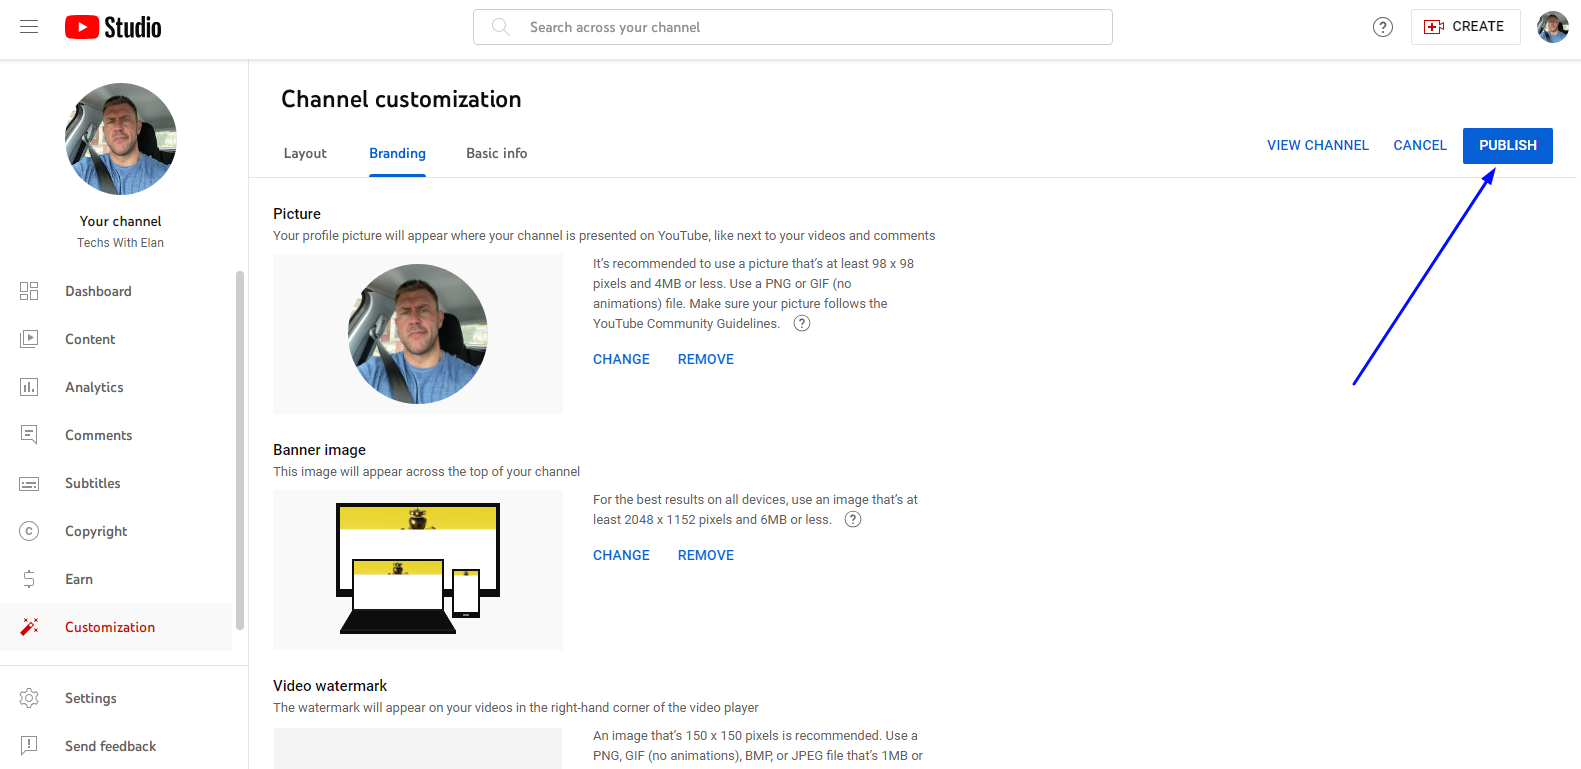
You’ll find the “Banner Image” section in the Branding tab. If you’ve never uploaded a banner, it will say “Upload.” If you’re changing an existing banner, it will say “Change.” Click on it, and a window will open for you to select the banner image from your computer.

Uploading and Adjusting the Banner
After you’ve selected your banner image, click “Open” to upload it. You’ll then see how your banner will look on different devices. If necessary, you can adjust the crop of your banner. Just remember to keep all critical content within the ‘safe area.’

Publish and Enjoy Your New Banner
Once you’re happy with how your banner looks, click “Publish.” YouTube will save your new banner, now appearing at the top of your channel page. Well done! You’ve successfully uploaded your YouTube channel banner! Remember, repeating these steps can change your banner as often as you like.
How to Setup Your YouTube Banner with Social Media Icons
Let’s say you have other social media profiles like Instagram, Facebook, or Twitter. You want your YouTube subscribers to follow you there as well. The question is, how can you lead them to these platforms? The answer is by adding social media icons to your YouTube banner! Here’s a step-by-step guide on how to do it.
Open YouTube and Go to Your Channel
First, you need to open YouTube. Make sure you’re logged into your account. Once logged in, click on the profile picture in the top right corner. From the drop-down menu, select ‘Your Channel.’
Customize Your Channel
You’ll find a ‘Customize Channel’ button when you’re on your channel page. This button is usually next to the ‘Subscribe’ button. Click on it, and it will take you to the customization page, where you can add or change things about your channel, like the banner or the social media links.
Go to the ‘Basic Info’ Tab
You’ll see different tabs on the customization page like ‘Layout’, ‘Branding’, and ‘Basic Info.’ Click on the ‘Basic Info’. This section is where you can add information about your channel, like the description, email address, and links to your social media pages.

Add Your Links
In the ‘Basic Info’ section, you’ll see a part labeled ‘Links.’ There, click on the ‘Add’ button. It will allow you to add new links to your social media profiles. You can add the title of the link (like “Facebook” or “Instagram”) and the URL of your profile.

Save Your Changes
After adding all your social media links, remember to save your changes. You can usually find the ‘Publish’ button on the top right corner of the page. Once you’ve clicked on this, your changes will be live, and your social media icons will appear on the bottom right corner of your YouTube banner.

As a YouTuber, having an attractive banner is crucial for making a good impression on your viewers. Fortunately, there are websites available that can help you create stunning YouTube banners, even if you need to become a design expert. Let’s look at two of the best websites for this task: Visme and Canva.
Visme

Visme is a powerful online design tool that offers a variety of templates, including YouTube banners. You can choose from their selection, customize it to your liking, or even create a design from scratch. Visme also has an extensive library of images, fonts, and other design elements.
Pros:
- The User-friendly interface makes it easy for beginners.
- Offers a wide variety of templates and design elements.
- Allows for customization, giving you the freedom to create unique banners.
Cons:
- Some features are locked behind a paywall.
- The site may need to load faster at times.
Canva
Canva is a popular online graphic design platform that offers an easy-to-use interface and a vast array of templates. It’s an excellent tool for creating YouTube banners, as it provides specific templates. Canva also offers a library of images, graphics, and fonts to customize your banner design.
Pros:
- The intuitive drag-and-drop design tool makes it accessible for all skill levels.
- Provides a vast collection of images and fonts.
- Offers a mobile app for designing on the go.
Cons:
- Some advanced design features require a paid subscription.
- Limited customizability compared to some other design tools.
Snappa

Snappa is another brilliant tool for creating high-quality graphics, including YouTube banners. Its interface is user-friendly and intuitive, which makes designing a hassle-free experience. Snappa also offers a wide selection of pre-made templates specifically designed for YouTube banners, making it easier for you to get started.
Pros:
- Snappa provides high-resolution downloads even for free users.
- It has a simple user interface.
- The platform has a substantial library of royalty-free images.
Cons:
- The number of downloads per month is limited for free users.
- Some design elements and features are only available for paid users.
Adobe Spark

Adobe Spark is part of Adobe’s suite of online design tools. It’s excellent for creating a range of graphics, including YouTube banners. While it offers fewer templates than other sites, its expansive customization options give you much creative freedom.
Pros:
- Adobe Spark provides advanced customization features.
- It integrates well with other Adobe products.
- The platform offers a mobile app for designing on the go.
Cons:
- Some users may find it less intuitive than simpler design platforms.
- The free version includes a watermark on your designs.
Conclusion: Maximizing Your YouTube Banner’s Impact
Understanding and using the correct YouTube banner size and dimensions is essential for making your channel stand out. Remember, the recommended banner size is 2560 x 1440 pixels, with a safe area of 1546 x 423 pixels. Design your banner with these dimensions in mind, and you’ll create an attractive and practical channel display.
Consider your specific needs, like the level of customization you want and your budget, when deciding between these platforms. Whether you’re a design novice or a seasoned pro, these graphics tools can help you create an engaging YouTube banner that will capture your audience’s attention.


